

Monday, October 29, 2012
Pollen In Late October???
I don't know where my girls are getting it from, but both hives were bringing in oodles of pollen today. Click on the photo to enlarge it. Do you see all that golden yellow pollen in their pollen baskets? Someone even dropped their load of pollen onto the top of the cinder block. I have their entrance reduced way down to help them stay warm and to keep out predators. Traffic is getting backed up at the door.

Sunday, October 28, 2012
Happy 30th Anniversary To Us!
Today the husbeast & I celebrated 30 years of wedded bliss. Our anniversary is actually tomorrow, the 29th, but you can't really party on a weekday when one of you has to work. I just happened to win a raffle, at the last cigar event we attended at Smokey Joe's, for a $50 gift certificate to the Space Needle in Seattle. I was born and raised here but had never been up in the Space Needle. What a nice way to celebrate our special day. I don't like crowds or freeways so going to Seattle isn't all that enjoyable for me. We decided to go at a time when traffic would be light and the crowds thinner. Sunday brunch would be perfect. On the ride up there I mentioned to the hubby that my grandparents used to have a beautiful decanter shaped like the space needle. I coveted that thing every time we visited them. What a young child wanted with it, heaven knows. I thought it was incredibly pretty. It might have been a Jim Beam bottle, but wasn't sure. Here is our destination looming in the distance. You can see the elevator going up the side.

My expectations were rather low. I seem to recall hearing that it was over priced and the food not very good. Here is the mural in the lobby, opposite the reception desk.


Only the seating deck revolves. The lobby stays put. I suffer from motion sickness so was a little worried at first. I was fine. Too busy eating and taking photos of the scenery. I was pleasantly surprised by how much I enjoyed this experience. The scenery was lovely, the service impeccable and the food divine. I highly recommend their brunch. Every course was delicious. I had the razor clam and corn chowder for a starter with a side of lemon bread. The best EVER. So good.

For a main course I chose the wild salmon with rainbow potatoes. Another winner.

And for dessert I had cheesecake. I only thought I'd had the best cheesecake. This melted in my mouth like butta.

That doesn't look like much food, right? I SO stuffed. The coffee was wonderful, too. If you visit Seattle I encourage you to try to visit the Sky City at the Needle. Yes, it's pricey but well worth it. Here is some of the scenery that comes with your meal.


My expectations were rather low. I seem to recall hearing that it was over priced and the food not very good. Here is the mural in the lobby, opposite the reception desk.

The view of the inside taken from our table.

Only the seating deck revolves. The lobby stays put. I suffer from motion sickness so was a little worried at first. I was fine. Too busy eating and taking photos of the scenery. I was pleasantly surprised by how much I enjoyed this experience. The scenery was lovely, the service impeccable and the food divine. I highly recommend their brunch. Every course was delicious. I had the razor clam and corn chowder for a starter with a side of lemon bread. The best EVER. So good.

For a main course I chose the wild salmon with rainbow potatoes. Another winner.

And for dessert I had cheesecake. I only thought I'd had the best cheesecake. This melted in my mouth like butta.

That doesn't look like much food, right? I SO stuffed. The coffee was wonderful, too. If you visit Seattle I encourage you to try to visit the Sky City at the Needle. Yes, it's pricey but well worth it. Here is some of the scenery that comes with your meal.

Look at all the houses!

Lake Union.


King 5 News. Wave to Jean!

The Emerald City.

A garden on the roof.

We love our football & baseball.

Elliot Bay, complete with ferries.


Where's Clark Kent?

The Olympic Mountain Range.

We used to love our basketball, too.
I watched many Sonics games here. ::sniffle::

And the Pacific Science Center.
I think Randine went swimming
there on a school visit.

After seeing that glorious panoramic view I have a new appreciation for Seattle. After dinner we went up to the observation deck. Inside on that floor they have a snack bar and lots of displays of space needle collectibles. Look what I found. My beloved decanter. Yes, it was a Jim Beam bottle.
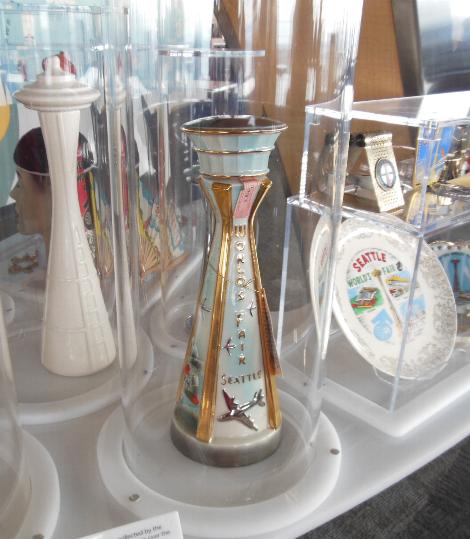
Still as beautiful as I remembered.

Kenmore Model 158.902
There's something I find irresistible about a vintage sewing machine. Especially if it's a novel color, like lavender. Luckily for me, apparently no one else in my area suffers from this affliction. I am able to feed my desire for classic machines quite inexpensively. The things I find alluring about the older machines are not valued by most folks in this day and age. The machines are heavy. The older they are, the heavier they will likely be. The progression was from cast iron, to steel, then aluminum and finally the plastic pieces of junk that are available today. The cabinets are heavy. Again, the older the cabinet, the heavier it will tend to be. Why? They used real wood. Wood is heavy. When your machine head, itself, weighs 40 lbs. you need a sturdy cabinet to house it. Flimsy particle board is not going to do the job. There's a reason those machines, from the 60's and before, are still around. They were quality. Let me introduce the latest addition to my sewing machine family, my new-to-me Kenmore model 158.902.

This is a lilac & cream 40 lb. beast. We took the machine head out of the cabinet in order to transport it. I think the machine weighs as much as the cabinet does. I was not able to find the date of production but I am guessing early 60's. It came with this solid wood cabinet (maple?) and the sewing chair which has storage under the seat. The cabinet is in amazingly good condition. The chair has a few small rips to the vinyl from normal wear and tear.


The machine also came with these accessories in their original lilac cases. There is a box with 2 layers of design cams, a buttonhole attachment, the original manual and a zipper foot. Even a lilac needle threader. Oddly it came with no other feet or bobbins but I have plenty of those floating around the sewing room. All of this cost a mere $20 and a trip to Tukwila. If this machine works well I will have to keep it and sell one of the other residents of the sewing room.

Friday, October 26, 2012
Homemade From My Garden
The garden is all finished for this year. I need to get out there and pull up the plant carcasses and toss them into the recycling container. These are the last two items made with this year's bounty. First up is the raspberry melomel that I've started. This contains honey and raspberries from my backyard. I am hoping to enter the resultant mead in the Fair next fall. Is this a blue ribbon winner in the making? I hope so.

Yesterday I made the last batch of spaghetti sauce for 2012. The tomatoes cooperated and got ripe just in the nick of time.


I am spoiled by my homemade spaghetti sauce. The store bought stuff pales in comparison.
Now to starting planning and dreaming about next year's garden and honey crop. Meanwhile, I have lots of sewing projects to keep me busy.

Yesterday I made the last batch of spaghetti sauce for 2012. The tomatoes cooperated and got ripe just in the nick of time.
Skinned and chopped tomatoes.

In the crock pot with all the other ingredients.

10 hours later we have delicious sauce.

I am spoiled by my homemade spaghetti sauce. The store bought stuff pales in comparison.
Now to starting planning and dreaming about next year's garden and honey crop. Meanwhile, I have lots of sewing projects to keep me busy.
Tuesday, October 23, 2012
Jammies: Part Eight (we have buttonholes!)
Today I was determined to finally finish these dang pajamas. All they needed were the buttonholes and buttons. How hard could that be? I planned on using my Bernina to make some simple buttonholes using the built in buttonholer. There was just one problem. It makes gawd-awful buttonholes. No matter how many times I tried.

After all this work I am not going to settle for ugly buttonholes. Not gonna happen. I have quite a few machines with almost as many buttonhole makers. The machine I was most familiar with was the dreaded Singer Touch & Throw (Touch & Sew). I drug it out and set it up on top of one of the sewing cabinets. Then I spent about 30 minutes trying to locate the manual and the feed dog cover plate. If you've ever had the misfortune of glancing into my sewing room you will understand why this was not an easy task. I finally located them, in the last place I looked. Armed with the sewing machine manual, the buttonhole attachment, and the manual for the attachment, I set to work learning how to use all of these to make some decent buttonholes.

Singer did not let me down. The manuals were very clear and the attachment worked great. I experimented with a few practice buttonholes until I got it just right. Buttonholes are a #$@*^ to rip out so you want to make sure things will go well before you attempt one on your actual project.

Fingers crossed and here we go. OMG! It's a real, honest to goodness buttonhole. One that I don't have to be ashamed of.

The buttonhole cams work like magic. I did go around it twice to make sure it is strong. I am quite pleased with the results. Even the backs look nice.

Once I had made all 5 of the buttonholes I carefully used my seam ripper to open them up.

I had already determined, when making my practice holes, that this was the proper size to fit my buttons.

I suppose the buttonholes could have been a bit straighter but I am still pleased with the results. Not bad for a first attempt. I now have a comfy new pair of pajamas and I'll be wearing them to bed tonight.

There are a few things I will alter for the next pair. The waistband is too high so I will shorten that by 2". The legs are a bit long so I will shorten those by another inch. And the armhole is too big and will be made 1" smaller next time. Sewing is so magical. You take big rectangles of fabric and a paper pattern....

...and turn them into something warm and useful. I am anxious to make some more pairs but first I need to sew some things for Christmas gifts. In the meantime I will also be learning how to use my serger. November is going to be a very busy month but I still hope to get some sewing accomplished. We shall see.

After all this work I am not going to settle for ugly buttonholes. Not gonna happen. I have quite a few machines with almost as many buttonhole makers. The machine I was most familiar with was the dreaded Singer Touch & Throw (Touch & Sew). I drug it out and set it up on top of one of the sewing cabinets. Then I spent about 30 minutes trying to locate the manual and the feed dog cover plate. If you've ever had the misfortune of glancing into my sewing room you will understand why this was not an easy task. I finally located them, in the last place I looked. Armed with the sewing machine manual, the buttonhole attachment, and the manual for the attachment, I set to work learning how to use all of these to make some decent buttonholes.

Singer did not let me down. The manuals were very clear and the attachment worked great. I experimented with a few practice buttonholes until I got it just right. Buttonholes are a #$@*^ to rip out so you want to make sure things will go well before you attempt one on your actual project.

Fingers crossed and here we go. OMG! It's a real, honest to goodness buttonhole. One that I don't have to be ashamed of.

The buttonhole cams work like magic. I did go around it twice to make sure it is strong. I am quite pleased with the results. Even the backs look nice.

Once I had made all 5 of the buttonholes I carefully used my seam ripper to open them up.
I had already determined, when making my practice holes, that this was the proper size to fit my buttons.
I suppose the buttonholes could have been a bit straighter but I am still pleased with the results. Not bad for a first attempt. I now have a comfy new pair of pajamas and I'll be wearing them to bed tonight.

There are a few things I will alter for the next pair. The waistband is too high so I will shorten that by 2". The legs are a bit long so I will shorten those by another inch. And the armhole is too big and will be made 1" smaller next time. Sewing is so magical. You take big rectangles of fabric and a paper pattern....

...and turn them into something warm and useful. I am anxious to make some more pairs but first I need to sew some things for Christmas gifts. In the meantime I will also be learning how to use my serger. November is going to be a very busy month but I still hope to get some sewing accomplished. We shall see.
Friday, October 19, 2012
Well, I'm Still Alive.
I bought more fabric today and the husbeast didn't shoot me. In fact he chauffeured me over to JoAnn's and waiting patiently in the car while I shopped. I had a 50% off coupon and wanted to pick up a copy of the book, 'Successful Serging'. I had already purchased 'The Complete Serger Handbook' from Amazon when I ordered the serger. Both of these books received rave reviews. I'm sure they'll be a huge help.

JoAnn's is having 60% off all their flannel so I had to make one last swing through that aisle. I'm enjoying sewing myself pajamas and can always use more.

I came home and promptly signed up for the online Craftsy.com course, 'Beginner Serging'. I am determined to master the serger. Speaking of the devil, here is my new Brother 1034D.

Jammies: Part Seven (The Home Stretch)
The pants are almost finished. Here is the front with the false fly and the pockets attached.


Then the instructions had me sew the backs to the fronts (without sewing the center back seam) and make the casing for the elastic. The pattern called for 1.25" wide elastic which necessitated a visit to JoAnn's. Once I had elastic of the required width I set about inserting it into the casing. Not an easy task. The elastic barely fit. 1" elastic would've been a better choice. I first employed my trusty bodkin. It made it about a third of the way through the casing then refused to budge. It finally let go of the elastic altogether. When I removed it from the casing I found it was a bit mangled. Thank goodness I was a cloth diapering kind of mama (back when cloth diapering wasn't cool) and had saved some of the diaper pins.They are the best thing ever for moving stubborn elastic through tight casings.


Once the elastic was in place the directions advised me to sew up the center back seam and tack the elastic seam to one side. Are they kidding me? After all the lovely attention to detail on the shirt and pants they end the project with a sloppy back seam and a big lump of elastic right in the middle of your back?
That's not going to be comfortable. Today I will remove the stitching from the first and last few inches of the casing, sew the center back seam, resew the casing leaving a small opening at the back, pull the ends of elastic out through that opening, lap the elastic edges and sew them together, poke the elastic ends back into the casing and sew the small opening closed. That will leave just the inner leg seams and hemming and the pants will be finished.
Tuesday, October 16, 2012
Classier Pattern Weights
No sewing yet. I decided to take a break and try to weed out some more clutter from the sewing room. I was making progress until a local gal made an offer that was too good to resist. I am now the happy owner of a full set of vintage June Tailor pattern weights. I paid $8 for the set. The same set, in poor condition recently sold on eBay for $29.99. Now I won't have to use my table knives to hold down patterns.


I also scored this giant spool of quilting thread for $2 (it sells for over $20) and 25 assorted zippers for $10.

I really love the pattern weights and can't wait to use them.
Saturday, October 13, 2012
Two Huge Boxes of Patterns!
Or...How My Mail Lady Got A Hernia. All my sewing friends, prepare to be jealous and hate me very much. These are what arrived on my doorstep this afternoon and man, are they a couple of heavy suckers. It cost the sender $43 to ship them parcel post.

That's right, 2 good sized cardboard boxes packed full with uncut sewing patterns. SQUEE!!!! How much did I pay for them? Absolutely nothing. This lady was cleaning out her craft room and no longer wanted the patterns. All she asked for was the shipping cost and she was willing to barter. I happened to have an unworn pair of hand knit alpaca socks in just her size. Someone had knit them for me a couple of years ago but they had knit them about 1.5" too short for my big feet. The yarn cost over $20...and then you have to factor in what it would cost for someone to knit them. I figured they were worth between $40 and $60. So that is how I turned these....

...into over $500 worth of sewing patterns (and that would be if they were on sale). I can't stop saying, "wow!" The coolest part is they are almost all my size and things I would actually sew and wear. Or things I would sew for my daughters. These are recent patterns, very up-to-date. Now to try to find some place to store them. If I try to buy more patterns my husband has permission to shoot me on the spot.


Subscribe to:
Posts (Atom)

