Saturday, January 26, 2013

I Did It!

I finished my dress at exactly 9:45 this morning. The awards dinner was at noon. I got less than 4 hours of sleep last night but it was well worth it. Everyone commented on my dress.


Whew! I can't recommend the class enough. You might want to give yourself a week or two, though. Completing a couture level dress in a week is pushing it. I'll spend all of next week catching up on my housework.

Yesterday I sewed in the lining. Sewing linings is not my favorite. Don't look too close.


Thursday, January 24, 2013

Is That A Light I See?

We're coming to the end of the tunnel. Yesterday was crucial to the success of this project. I had to insert the sleeves and the zipper. The sleeves went in fairly easily. I pin basted the first one in place but had some shifting when machine sewing. I hand basted the second one in and it went more smoothly. The time consuming part was cleaning up the sleeve seams, pressing them, and catch stitching them neatly down. The end result is worth the extra effort. I need a bit of stay tape in the shoulder seams and I will also fashion some sleeve head tape from white fleece fabric. I think the sleeves will benefit from that additional detail. It will give a bit more structure to the sleeve cap which is looking slightly droopy right now.


The sleeves took most of the day to complete but I also needed to get the zipper inserted. I was up until 11 pm finishing that. I am thrilled with how it turned out.


I am nearing the finish line and am optimistic that I will be wearing this dress on Saturday. Today's tasks? Clean up the interior of the dress with more catch stitching, work the hems and get started on the lining. I am not sure I have enough lining fabric so may be making a quick run to JoAnn's.

Wednesday, January 23, 2013

Keeping The Hope Alive.

I made some good progress yesterday. Mind you this is getting my undivided attention. Sorry, honey. I need to live in couture land for another few days. I'll be back on Saturday. Pay no attention to those piles of dishes. You knew I was OCD when you married me. Meanwhile you can gaze at this lovely pile of fabric.

Yesterday I finished the bodice and attached it to the rest of the body of the dress. This required more of the same; seam sewing, basting removal, seam trimming, pressing, catch stitching, etc..BUT I also learned something new. How to make stay tape from organza selvage and where and how to use it. It is super awesome stuff. You use it in places (mostly bias cut areas) where you don't want the fabric to stretch and distort. Here is some basted in along the neckline.


And these pieces are tacked in along the midriff seams. The waistband is the focal point of this dress and I want to make sure it stays looking nice.


I am still clinging to the slim hope this garment will be ready by Saturday afternoon. On wards and upwards. Today's mission? Set in the sleeves, insert the zipper (by hand, of course) and possibly work the hems.  The one tricky parts of this dress, for me, are the shoulder seams. I am not sure how to make them snug.

Monday, January 21, 2013

Skirt Nearly Finished.

Do you know what takes almost as long as hand basting a dress together? Removing 3 sets of basting stitches after you've finally machine sewn the seams. Especially when you are trying to be accurate and follow the basted seam lines with your stitching. The basting was a booger to remove. Here is the skirt portion of the dress.


Couture sewing is to regular home sewing what Julia Child is to Betty Crocker. Today I sewed the vertical seams, removed all the basting stitches from them, trimmed and pressed them, then catch stitched them to the underlining.


This method of sewing is very time consuming, which is why I doubt I will complete the dress in time to wear it this coming Saturday. It took most of today to get the skirt ready. Now to attack the midriff, then the bodice. There are a lot of seams in this dress. I will need to make a couple of small alterations based on today's fitting. I must have mutant shoulders because I need to take about an inch out of the shoulder seams at the neck edge.  I also need to angle the sleeve darts upwards about 1/4". That's all for today. Back I go.

Reality Check

I spent all of yesterday meticulously hand basting the dress together. That was a LOT of basting. My fingers are sore. Here it is. Keep in mind that the dress is basted with huge seams and has not been pressed. It is ready for another fitting. I am concerned the shoulder seams may need taking in. I may also have to adjust the elbow dart.


At this point I am not sure I am loving this dress. The herringbone is way too subtle. From a distance the dress appears to be gray, not gray and white herringbone. I was hoping the bias herringbone design would add visual interest to the otherwise bland, neutral color. Now my plan is to use the decorative top stitching, shown on the pattern cover, to accent the bodice and midriff. The plain dress will really show off the statement necklace I plan to wear, though. I am now accepting the fact that there is a good chance this dress will not be finished in time. I do have a back up dress, just in case. Today I will begin machine sewing the seams, pressing them, trimming them down and catch stitching them to the underlining. The dress will look much better once that is accomplished.

Sunday, January 20, 2013

Guess What I'm Good At?

Basting! I finished all 24 pieces by 10:30 this morning.


I happened to have this spool of vintage silk thread in my stash. It went through the fabric like buttah.


It was just barely enough to finish basting this project. Now the spool is empty. I'll have to be on the lookout for more old silk thread. I think of adding the underlining as a marriage between the two fabrics. When they are pinned (before cutting the fashion fabric) they are meeting and getting to know each other. Once the fashion fabric is cut and you steam the 2 sides of the fabrics they get much closer and are now engaged (you definitely need glass head pins. Yes, the plastic ones really do melt). Once they are basted together they become wed. The two become one, so to speak. Next step? Basting the dress together for my final fitting. I hope to have it all basted together today so Rick can help me fit it tomorrow.

Saturday, January 19, 2013

Point Of No Return

Well, I did it. The fabric has been pinned and cut. Here it is all laid out on my nice, clean kitchen floor. That's one way to get me to mop.


Today was the perfect opportunity for this job. My husband is working this weekend and my little dog was napping on my bed. No distractions. I did have one helper, though. He thinks he's helping. 


It should be fairly smooth sailing from here. There will be a lot of hand sewing but it should go pretty fast. At least now the fabric will be in manageable pieces. Today I visited JoAnn's to use my two 50% off coupons before they expired. I bought myself a bolt of 90" wide by 10 yards of un-dyed muslin. Regular price would be $60. 


I used the other coupon to buy this bottle of sewing machine oil with a telescoping point. Last month I sent my husband on a mission to find an oiler that could get way down inside my sewing machines. He looked all over at hardware stores and finally found one called a precision oiler. It was pricey, too. Who knew they had what I needed at JoAnn's? They must've just recently started stocking them.


I also got some of the quilting pins that my instructor uses in this course. She swears by them for matching stripes and plaids. I want to match the stripes up the side of my dress. ALL quilting notions are currently 50% off at JoAnn's, in case you need to run and grab anything.


Friday, January 18, 2013

Back In Business

It has taken me a while to get back to work on my dress. I was unable to find silk organza locally and it is rather crucial to this project. I ordered some from Dharma Trading Company, online. It arrived yesterday and I am now able to proceed. Tonight I cut and marked my organza pieces. Tomorrow I'll be cutting the fashion fabric. Then there will be lots and lots of hand basting to do.

The muslin pinned to the organza underlining.

Transferring seam lines and markings to the organza.

Wednesday, January 9, 2013

The Muslin Process

So far, so good. There was a point yesterday when I was getting a bit tired of basting seam lines and assembling pieces but all in all I  am finding the muslin making process very enjoyable. I don't have time to order large pieces of dressmakers carbon so I have taped 2 smaller pieces together. This is some vintage stuff I picked up at either a thrift store or yard sale. Sometimes being a hoarder comes in handy. The sheets had never been used and it seems to be very good quality. Here is a picture of the paper, tracing wheel, and some already basted pieces.


And the entire pile of basted pieces, ready for assembly.


The instructor says she then sews the pieces together with the same black thread "because it's easy to tell the difference between the seams and the basting." I know myself well enough to know that I beg to differ. I thought it would be prudent to use red seam thread. It's a good thing I did as I wound up sewing the wrong skirt panel on and had to remove it. At one point I was muttering under my breath, "could this thing have more friggin' pieces?" It was like putting a puzzle together. This is as far as I got last night before bed. The skirt, midriff and one sleeve are sewn.


This morning I sewed the bodice and pinned everything to my faithful dress form, Mama Smurf.


It looks like I may have guessed my sizing correctly. I definitely needed that extra room in the midriff. The bodice looks a little iffy on Mama. Kind of tight. I am hoping it is because the form is not as bosomy as I am. In order to get the right chest circumference I had to make Mama shaped like a linebacker but her front isn't filled out. I am thinking the bodice will fit me better. After this posting I will unpin and then properly re-pin the dress so I can try it on myself and have the husbeast help me with the fitting.


Otherwise the muslin seems to be okay. The seams all match up and things are hanging straight. Those black lines on the back and front bodice are the original seam (fold)  lines. I am going to raise the front a smidge and the back quite a bit.


This is my morphed sleeve. It was originally a short, 2-piece sleeve. Thanks to the instructor I was brave enough to attempt to not only morph the 2 pieces into 1 (with the aid of that shoulder dart) but to also add length and an elbow dart. I may have to slim the sleeve down and raise the elbow dart. We'll see. I want a nice 3/4 sleeve.


Today I'll visit JoAnn's to purchase silk organza for underlining. After the fitting and any muslin adjustments it will be time to start playing with the intended fabrics. Yay!

ETA: the muslin making process uses a LOT of thread so next time thread is 50% off I'll be stocking up on red and black.

Tuesday, January 8, 2013

My First Attempt at Sewing Myself a Dress

Here goes nothing. Sink or swim. I've had the Craftsy.com Couture Dressmaking course in my queue for many months. I now find myself needing a new dress to wear to a dinner function on the 26th of this month. Here are the fabric and pattern I'll be using.


Since this is a winter dress I chose a substantial fabric. I also wanted something a bit classier than I am usually drawn to. I can't help myself, I am drawn to the gaudier colors and prints. I want this dress to be something that a business woman would wear. I had no say in the dress pattern, itself, as it was included in the price of the class. I do like it, though. I'll be making view C but I will attempt to add 3/4 sleeves. My main fabric is a poly/rayon/spandex blend in a black and white herringbone. I will be cutting the fabric on the bias for the skirt side panels, the bodice sides and the waist band. I am hoping it adds some visual interest to my rather boring fabric choice but the lines may be too subtle to show up. I won't know until it's finished. Here is a close-up of the fabric.


Here are some other supplies I added to the sewing studio. 10 yards of inexpensive muslin, a sleeve roll, and some French curves.


I will be attempting to morph the sleeve from Vogue 8211 onto the sleeve cap of 8648 . 8211 is actually a coat. I think it is lovely and had it filed in with my dress patterns. I'd love to have a dress like that.


Here is a close-up of the sleeve dart detail.


I will also be attempting to morph sizes as I have the classic "middle aged woman" figure where my middle is a larger size than the rest of me. I have these books and video at my disposal but have a severe time crunch so won't be able to refer to them much.


Time to soldier on. I am using couture dressmaking techniques which involve transferring the stitching lines and all of the pattern information to pieces of muslin which you can alter further and those become your actual pattern. I am in a bit of denial about my real size so will probably end up making 2 muslins. Time will tell. I chose a middle of the road muslin. Not too flimsy and not too narrow. Here I have the selvages pinned and am ironing.


 In couture the big thing is "in grain we trust". Sadly I did not choose my muslin wisely. The weft grain is way off on one side as you can see in the following photo. This is where I tore off the fabric from the bolt. This should be a straight edge. It is fairly straight from one selvage to the center but the second half is skewed badly. Oh well, lesson learned. Let's press on.


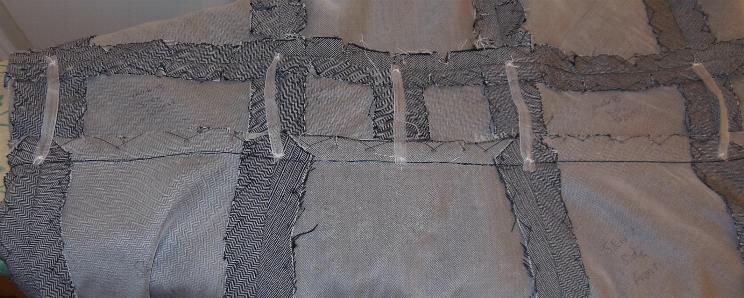
Time for another important muslin lesson. When you are going to be placing large pattern pieces on the bias you'll need wide muslin. I will have to piece the bottom edges of the skirt sides.


Are we having fun yet? This was as far as I got yesterday. Today we will be transferring the markings to the muslin. We're getting to the juicy part.