Showing posts with label Garments. Show all posts

Friday, August 30, 2013

Vintage Dress, 1967

Now that the weather is cooling, and the garden and bees are wrapping up for the season, I am starting to think about my next sewing project. I have been itching to sew a vintage style dress. I recently bartered for 2.5 yards of a navy blue crepe suiting which led me to dig out this dress pattern.

 
The fabric is a poly crepe. Nothing fancy or expensive. This will be an experiment to see if I can resize this vintage pattern to fit me. I'll need to size it up a bit. The zipper and self-cover buttons were already in my stash. I picked up the contrasting crepe for the yoke, and the white lining, at Jo-Ann fabrics, along with some matching thread.
 
I'll need to do some adjustments to the pattern, and sew up a muslin or two, before I cut into the fashion fabric.

Monday, July 22, 2013

It Fits!

And it is very comfortable. This picture is for you, Pearl.


Thursday, July 18, 2013

A Couple of Last Minute Details

I thought I was done but not quite. Today I added some French tacks to the inside, to anchor the lining to the shirt bottom. Now it won't end up bunched under my arm pits.


I also added one of my exclusive labels. LOL!

Today I also returned to Jo-Ann's to pick up more of the metallic embroidery thread. While there I couldn't resist grabbing one of the Jo-Ann's 70th Anniversary Bags. How cute is this!?!! I'm a sucker for vintage sewing machines and fashions.


All Finished With My Crazy HIppie Shirt

Ta Da!


That was a fun distraction. And it fits! I plan to wear it to breakfast at Shakabrah tomorrow. They have the best breakfast in Tacoma. We go there at least once a week.

Yesterday I knuckled under, ignored everything else, and finished the top. The sleeves have the same seam as the tunic sides, as well as matching decorative hem.


This shows what the reverse side of the decorative stitching looks like. I used a white polyester thread in the bobbin.


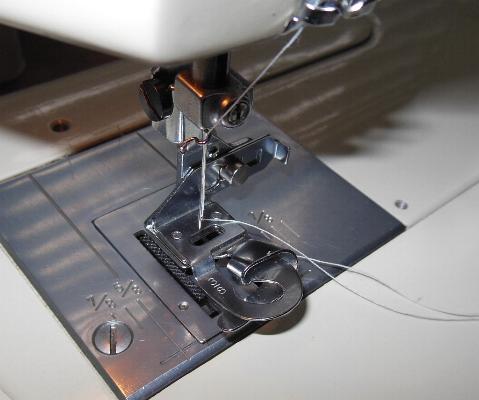
A close ip of the Kenmore 1914 sewing the decorative stitches.

The baby seam I used on the lining.

That seam is only 1/8" wide. It is a bit bulky, though, which I found out while hemming (see below). I learned this technique in a book I found at Half Price Books when they sent me some coupons.


Baby seams are found on page 18 & 19. The technique comes from designer Bill Travilla who is probably most famous for designing Marilyn Monroe's iconic halter dress for that scene in the 'Seven Year Itch'. For the narrow hem I used the model 1914 and a hem stitch foot.


 I started practising with a 3/8" foot but switched to a 1/4".There is a bit of a learning curve. I still haven't quite mastered it but I know that "in theory" it makes hemming easier. I had to spend extra time fixing my hemming boo-boos. And I learned that the baby seams are too fat to fit through the hemmer. But all in all I liked the result.


I basted the lining to the top, wrong sides together, and treated them like one faric from the armholes up.


The sleeves took a bit of easing. The sleeve caps were way too big for the holes and the notches didn't match up. Not even close. But I made it work. Here is a close up of the neckline featuring my home made bias tape.


It was a fun project and I learned a lot. The top is very comfortable and I know I'll be making many more of this design.

Tuesday, July 16, 2013

Moving Right Along

Yesterday I sewed the side seams and hemmed the new top. First the hem. This pattern calls for a 1 1/4" hem, with the 1/4" turned under and the edge top stitched. I am going to use a decorative stitch along the hem so opted to save steps (and thread) and use some "Stitch Witchery" to secure the hem. It also adds stability to that area for the decorative stitching.


It turned out to be a much better stabilizer than the one I used around the neckline. My decorative stitches at the hemline are nice and crisp. I am finding the metallic thread to be rather temperamental. It breaks easily, and did so 3 times across the front hem and once along the back. I am getting very proficient at figuring out how to match up the design when restarting. You really can't tell where the breaks happened. Next up, the side seams. Again, this is a very thin woven fabric. I need strong seams. I also need to finish the raw edges so they don't ravel. The bottom of the hem has side slits, too. Hmmmm....I had an idea in my head of the type of seam I wanted but could not find it listed in my sewing books so am not sure what this type of seam is called. If you know, please leave a comment. What I did was to turn the seam allowance over, in half, on the inside and then top stitch 1/4" away from the seam on either side. I continued this seam down along both side slits. I think it adds a nice design element while making strong, tidy seams.

right side

wrong side

Today I will tackle the lining. I want the lining to stop just before the side slits and have a very narrow hem. I believe I have some special feet designed specifically for that purpose. I am also going to attempt a "new to me" seam, called a baby seam, which is very narrow and great for thin fabrics.