

Wednesday, August 21, 2013
Honey Harvest 2013....Thus Far
I harvested these 3 medium frames on Monday of this week. I estimate that will give me approx. 12 jars. I anticipate getting at least this much, again, in a week. The bees aren't quite finished capping all the honey in the super. I am going to hold these 3 frames aside (probably sealed in an Igloo cooler) until I have more. I'd rather only extract once.


Saturday, August 17, 2013
Vintage Linens Found Today
These are the vintage hand embroidered items I found at a yard sale this morning. Some also feature crochet or applique. I appreciate these because I know how much work went into them.


A pair of pillowcases with embroidered roses.
These have lace hand sewn to the edges.

A single pillowcase with embroidered calla lilies.
This has a green crocheted edging.

An embroidered dresser scarf with a crocheted edging.

A dish towel with appliqued dress and embroidered details.

I paid $4 for the lot.
Late Season Yard Sales
I haven't been going to many yard sales this summer. I am trying to downsize and pack for my upcoming move to a homestead property. I really need to concentrate on giving things away, not dragging more home. Today my love of garage sales won out over common sense and I ventured out to a few sales in the near by neighborhoods. This was my haul. Or most of it. I also picked up some nice pinking shears and some vintage linens but those didn't make it into the photos.
MAD MEN style vintage red patent leather purse. Probably from the 50's. It's in very good condition, structurally, but it does have some black dye transfer....mostly on the back. Heck, it was only $1. I still love it and plan to actually carry it out in public. I want to collect more vintage purses.


Set of 3 nesting baskets with lids. $1 for the set. These will be great for using in my sewing room.

And a few books on self sufficiency, gardening and upholstering. $.50 each. These will be useful on the homestead.

MAD MEN style vintage red patent leather purse. Probably from the 50's. It's in very good condition, structurally, but it does have some black dye transfer....mostly on the back. Heck, it was only $1. I still love it and plan to actually carry it out in public. I want to collect more vintage purses.

A pristine harvest gold Grind O Mat from the 70's. With all the pieces. It clamps down onto the counter with suction. I have a fancy motorized grinder/sausage stuffer but this will come in handy for grinding something quickly. I have a recipe for Italian sausage I want to try out. This grinder was $2.


And a few books on self sufficiency, gardening and upholstering. $.50 each. These will be useful on the homestead.

All that for under $5.50! You gotta love yard sales.
Wednesday, July 31, 2013
Thundercloud Wine?

Our street is lined with Thundercloud plum trees. Some of them even bear fruit. My next door neighbor's tree is a heavy fruit bearer. Each year the neighborhood kids congregate to pick most of the low hanging plums....usually long before they are ripe. However this year they missed one large area.

I asked my neighbor if it would be OK if I pick them and attempt to make some wine. He doesn't do anything with them so was happy to oblige. I have a huge container of generic honey that I need to use up. I prefer my bees' honey for eating but this generic stuff is fine for mead making. For those who don't know mead is wine made from honey instead of sugar. And melomel is a fruit mead. Here is the recipe I am using, in case anyone else has access to Thundercloud plums. I can't promise the wine will be any good, though, as this is my first attempt at this wine flavor.
Thundercloud Plum Melomel
· 2 # honey
· 1/2 tsp. acid blend
· 1/2 tsp. pectic enzyme
· 1 tsp. nutrient
· 1 campden tablet, crushed
· package wine yeast (or 1/4 tsp in starter)
Wine begun 7-30-13.
Step 1: Pick and wash plums. Break them open with your fingers. Don't remove pits yet. Place into a must bag. Squeeze out as much juice as you can into the primary fermenter. This will also free up the pits. Remove pits from must bag.

Step 2: Add all remaining ingredients except the yeast. Add enough water to make one gallon. Make sure to allow for the weight of the must bag.

Step 3: Take the specific gravity. You are aiming for a beginning SG of 1.090. Mine was spot on.
Step 4: Top with a kitchen towel or cotton cloth and secure with a rubber band. Let sit for 24 hours. This gives the campden tablet time to kill off any wild yeasts that were present on the plum skins, and then gas off. You don't want it to kill your wine yeast.

Meanwhile prepare a yeast starter.
Yeast starter: 1/4 cup warm water, 1 tsp. sugar, 1/4 tsp. wine yeast, 1/4 tsp. yeast nutrient. Cover loosely and let sit until ready to pitch. This will give your yeast a big head start.

Step 5: After 24 hours pitch the yeast into the juice mixture and replace the cloth cover.
Step 6: Stir daily and squeeze juice from the bag. On the 3rd day check the SG. if it is 1.040 or above, rack to the secondary fermenter and attach airlock. While in the secondary it is important to keep the wine out of the light. Cover it with a thick towel or store it in a dark cupboard or closet.
Step 7: Rack again in 3 to 4 weeks. Then rack every 2 months, as needed, until there is no more sediment.
If you don't rack this often, nothing bad will happen. It's best not to have the wine sit on the lees (sediment) for too long but wine does OK if you ignore it. Just check the airlock often and replace the liquid (water or sanitizer) if it gets low.
Step 8: Bottle. I usually keep my wine in the secondary for 9 to 12 months before bottling.
I like to back sweeten my fruit wines at bottling. I add a cup of sugar (or honey) per gallon of wine, give or take. Dissolve the honey or sugar in water before adding. If you sweeten your wine you will also need to add a stabilizer or it might begin fermenting again and you'll have a mess when the corks pop or the bottles explode. Add 1/2 tsp. of stabilizer when you sweeten, then bottle.
Monday, July 22, 2013

Thursday, July 18, 2013
A Couple of Last Minute Details
I thought I was done but not quite. Today I added some French tacks to the inside, to anchor the lining to the shirt bottom. Now it won't end up bunched under my arm pits.


Today I also returned to Jo-Ann's to pick up more of the metallic embroidery thread. While there I couldn't resist grabbing one of the Jo-Ann's 70th Anniversary Bags. How cute is this!?!! I'm a sucker for vintage sewing machines and fashions.


I also added one of my exclusive labels. LOL!

Today I also returned to Jo-Ann's to pick up more of the metallic embroidery thread. While there I couldn't resist grabbing one of the Jo-Ann's 70th Anniversary Bags. How cute is this!?!! I'm a sucker for vintage sewing machines and fashions.

All Finished With My Crazy HIppie Shirt
Ta Da!


Yesterday I knuckled under, ignored everything else, and finished the top. The sleeves have the same seam as the tunic sides, as well as matching decorative hem.

This shows what the reverse side of the decorative stitching looks like. I used a white polyester thread in the bobbin.

A close ip of the Kenmore 1914 sewing the decorative stitches.

The baby seam I used on the lining.

That seam is only 1/8" wide. It is a bit bulky, though, which I found out while hemming (see below). I learned this technique in a book I found at Half Price Books when they sent me some coupons.

Baby seams are found on page 18 & 19. The technique comes from designer Bill Travilla who is probably most famous for designing Marilyn Monroe's iconic halter dress for that scene in the 'Seven Year Itch'. For the narrow hem I used the model 1914 and a hem stitch foot.
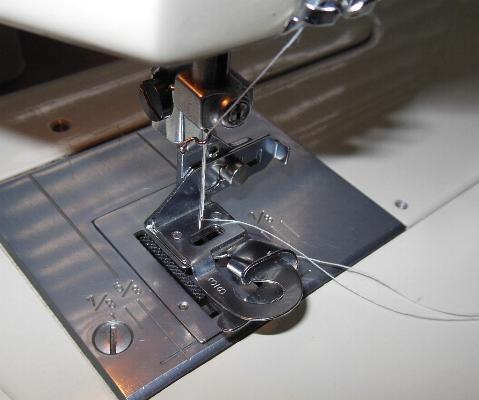
I started practising with a 3/8" foot but switched to a 1/4".There is a bit of a learning curve. I still haven't quite mastered it but I know that "in theory" it makes hemming easier. I had to spend extra time fixing my hemming boo-boos. And I learned that the baby seams are too fat to fit through the hemmer. But all in all I liked the result.

I basted the lining to the top, wrong sides together, and treated them like one faric from the armholes up.


It was a fun project and I learned a lot. The top is very comfortable and I know I'll be making many more of this design.
Subscribe to:
Posts (Atom)


