Showing posts with label Sewing. Show all posts

Friday, August 30, 2013

Vintage Dress, 1967

Now that the weather is cooling, and the garden and bees are wrapping up for the season, I am starting to think about my next sewing project. I have been itching to sew a vintage style dress. I recently bartered for 2.5 yards of a navy blue crepe suiting which led me to dig out this dress pattern.

 
The fabric is a poly crepe. Nothing fancy or expensive. This will be an experiment to see if I can resize this vintage pattern to fit me. I'll need to size it up a bit. The zipper and self-cover buttons were already in my stash. I picked up the contrasting crepe for the yoke, and the white lining, at Jo-Ann fabrics, along with some matching thread.
 
I'll need to do some adjustments to the pattern, and sew up a muslin or two, before I cut into the fashion fabric.

Monday, July 22, 2013

It Fits!

And it is very comfortable. This picture is for you, Pearl.


Thursday, July 18, 2013

A Couple of Last Minute Details

I thought I was done but not quite. Today I added some French tacks to the inside, to anchor the lining to the shirt bottom. Now it won't end up bunched under my arm pits.


I also added one of my exclusive labels. LOL!

Today I also returned to Jo-Ann's to pick up more of the metallic embroidery thread. While there I couldn't resist grabbing one of the Jo-Ann's 70th Anniversary Bags. How cute is this!?!! I'm a sucker for vintage sewing machines and fashions.


All Finished With My Crazy HIppie Shirt

Ta Da!


That was a fun distraction. And it fits! I plan to wear it to breakfast at Shakabrah tomorrow. They have the best breakfast in Tacoma. We go there at least once a week.

Yesterday I knuckled under, ignored everything else, and finished the top. The sleeves have the same seam as the tunic sides, as well as matching decorative hem.


This shows what the reverse side of the decorative stitching looks like. I used a white polyester thread in the bobbin.


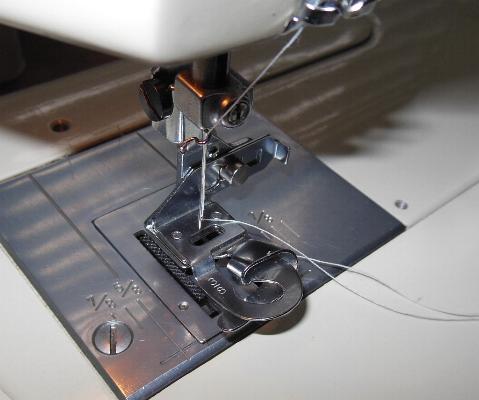
A close ip of the Kenmore 1914 sewing the decorative stitches.

The baby seam I used on the lining.

That seam is only 1/8" wide. It is a bit bulky, though, which I found out while hemming (see below). I learned this technique in a book I found at Half Price Books when they sent me some coupons.


Baby seams are found on page 18 & 19. The technique comes from designer Bill Travilla who is probably most famous for designing Marilyn Monroe's iconic halter dress for that scene in the 'Seven Year Itch'. For the narrow hem I used the model 1914 and a hem stitch foot.


 I started practising with a 3/8" foot but switched to a 1/4".There is a bit of a learning curve. I still haven't quite mastered it but I know that "in theory" it makes hemming easier. I had to spend extra time fixing my hemming boo-boos. And I learned that the baby seams are too fat to fit through the hemmer. But all in all I liked the result.


I basted the lining to the top, wrong sides together, and treated them like one faric from the armholes up.


The sleeves took a bit of easing. The sleeve caps were way too big for the holes and the notches didn't match up. Not even close. But I made it work. Here is a close up of the neckline featuring my home made bias tape.


It was a fun project and I learned a lot. The top is very comfortable and I know I'll be making many more of this design.

Tuesday, July 16, 2013

Moving Right Along

Yesterday I sewed the side seams and hemmed the new top. First the hem. This pattern calls for a 1 1/4" hem, with the 1/4" turned under and the edge top stitched. I am going to use a decorative stitch along the hem so opted to save steps (and thread) and use some "Stitch Witchery" to secure the hem. It also adds stability to that area for the decorative stitching.


It turned out to be a much better stabilizer than the one I used around the neckline. My decorative stitches at the hemline are nice and crisp. I am finding the metallic thread to be rather temperamental. It breaks easily, and did so 3 times across the front hem and once along the back. I am getting very proficient at figuring out how to match up the design when restarting. You really can't tell where the breaks happened. Next up, the side seams. Again, this is a very thin woven fabric. I need strong seams. I also need to finish the raw edges so they don't ravel. The bottom of the hem has side slits, too. Hmmmm....I had an idea in my head of the type of seam I wanted but could not find it listed in my sewing books so am not sure what this type of seam is called. If you know, please leave a comment. What I did was to turn the seam allowance over, in half, on the inside and then top stitch 1/4" away from the seam on either side. I continued this seam down along both side slits. I think it adds a nice design element while making strong, tidy seams.

right side

wrong side

Today I will tackle the lining. I want the lining to stop just before the side slits and have a very narrow hem. I believe I have some special feet designed specifically for that purpose. I am also going to attempt a "new to me" seam, called a baby seam, which is very narrow and great for thin fabrics.

Monday, July 15, 2013

A Summer Sewing Project

I apologize for not posting very much this summer. Beekeeping has been keeping me very busy. I started the season with 2 hives. One was sick and I wound up losing that queen. Then my strong hive swarmed. First to a spot high up in my next door neighbor's chestnut tree, then they moved across the street to a lower tree and I was able to capture them. Now I have 3 hives. The hive that threw the swarm also wound up queen-less so I have purchased 2 new queens this year. The hives are back on track but for some reason they are not taking to the new shallow supers or the yellow rite cell foundation.

Now that the bees have settled down I can turn my attention back to sewing. I don't have the concentration for an involved project but I would like to make some easy, cool clothing items for the summer. This prompted me to look through my stash and I found this fun piece of cotton that I had picked up at Jo-Ann's during one of the "50% off the clearance fabric" sales. I took all they had left, which was only 1.75 yards. The colors are teal green and blue. The fabrics is sort of tie dye/batik/camo-ish.


I looked through my patterns and found one for a pullover t-shirt top that only requires 1.75 yards. Perfect. It is Butterick 3383 and I am making view E. Scoop neck, 3/4 sleeves....not even any darts. I was worried about it fitting since there was no zipper or buttons and no shaping to speak of. I made a small muslin, just the front and back, to slightly below the armholes (no sleeves), and tried it on. The only modifications I made to the pattern were to move the shoulder seams back 1/2" at the neck edge, shorten the sleeves 2" and grade the pattern from an 18 at the top, to a 16 at the hem. The pattern just barely fit on the fabric. There was no way to try and manipulate what part of the fabric design would end up where. That is the front piece in the photo, above. I am glad those big light rectangles ended up where they did. It could have been much worse. The machine in that same picture is my Kenmore 1914. Probably the nicest machine Sears ever sold. I found mine for $20. I had to drive all the way to Whidbey Island to fetch it, and it had been badly abused. But it came with every single attachment including the monogrammer, buttonholer, design cams...etc...It needed a bit more help than I could give it, so I paid our local "old sewing machine guy" $50 to give it a thorough going over and a new belt. A $70 total investment for a machine that usually sells for $200 or more. Yes, I am really happy with that purchase.

Back to the tunic project. Since this is a very easy pattern I decided to spice it up a bit and experiment with some techniques I'd been meaning to try. This top calls for a bias tape facing around the neckline. The colors of bias tape available at the fabric store is extremely limited. What a great opportunity to finally learn how to make my own bias tape. I ran over to Jo-Ann fabrics to pick up a 1/2" bias tape maker (which just happened to be on sale for 50% off!). The Clover bias tape makers are supposed to be the best, so I bought the 2 sizes they had in stock. There are a bunch of online tutorials for making bias tape. I opted to use this one which shows how to make a continuous strip of bias tape.


While at Jo-Ann's I noticed they had Gutermann thread on sale for 40% off. I picked up some of their decorative metallic threads. This tunic is going to be rather plain and I want to add some pizzazz with fancy threads and decorative stitching. Here is the neckline. My shirt has its own jewelry!


I applied the decorative stitching using the Kenmore 1914 and one of its design cams. I will add the same design to the cuffs and hem. As you can see in the first picture, this fabric is very thin. I like to leave some things (like my lumpy body) to the imagination. I will be adding a lining to this top, even though the pattern does not call for one. This is how far I have gotten. Now back to work.


Wednesday, March 20, 2013

Busy With Bees....Now Some Sewing

Sorry I have been so quiet. I have been scrambling trying to figure out the best course of action to take for my bees this spring. Since discovering the varroa mites I have applied 2 applications of HopGuard, 9 days apart. I was shooting for 7 or 8 days but the weather didn't cooperate. I figure as long as it was somewhere between 7 and 10 days I'll be fine. I will apply one last dose in another week. The screened bottom boards with varroa trap drawers have been ordered, along with nine 8 frame shallow supers. I recently sold one of my spinning wheels so now have the funds to order up the rest of my bee supplies for the year, to include frames and foundation for my new shallow supers, a pollen trap, and a third screened bottom board to use for the new hive I plan to start from a split off the Carniolans. They have proven much gentler than my Italians plus they didn't have the awful dysentery issues that the Italians did. I want to keep those genetics going. Now that things have settled down with the bee girls I had some free time to sew my son's birthday pajama pants. True, his birthday was February 24th. Here they are, better late than never.


A close-up of the mock fly.

It isn't easy to find pajama flannel designed for grown-up guys. This son has always loved spicy food so the jalapeno print is very appropriate. I think PJ bottoms will be my go-to gift from now on. They are quick, easy, and useful. Once I have the pattern tailored to the individual I can sew a pair in a day. Next pair will be for my husband. He's put in his request.

Friday, March 1, 2013

Lekala 8004 (FREE Pattern)

This is my first wearable muslin. For those non-sewists a muslin is a trial run at a pattern. You sew it up in a fabric you don't mind wasting in order to see how it works before you cut into your nice, expensive fabric. With woven garments most muslins are made from muslin, hence the name. But knit muslins need to be made from a knit fabric, preferably with a similar stretch and drape to the intended fashion fabric. This is how my first wearable muslin (as the name implies it is a muslin you can also wear) came into being.

I was cruising around a sewing board on Ravely and happened upon a lady's version of a Star Trek top. Being a long time Trekkie I was immediately interested. Come to find out she got the pattern from an online Russian pattern company, Lekala. This company provides custom pattern PDF's specifically tailored to your unique measurements. How awesome is that? And the patterns are inexpensive. Some are even free (like this top pattern). I was intrigued and set about sewing one up immediately to see if the fit was all it was cracked up to be. I downloaded 8004 and began piecing it together so I could trace it off onto freezer paper.


I immediately ran into a snag. every 3rd page of my pattern printed incorrectly. I am sure it is an issue with my printer but I was able to cobble things together enough to use by adjusting some cutting lines like the one below.


I cut out the fabric pieces and pinned them to Mama Smurf. Things looked pretty good so I pressed on.


Before I started sewing the top together I used an over edge stitch to finish the edges. No, I still have not made friends with my serger. That will take some time and I am too impatient. Must get sewing!


I hemmed the front neck edges, joined those to the midriff and sewed the shoulder seams. I used some clear elastic to stabilize the shoulder seams. I learned that trick from the Craftsy Sewing with Knits class. It was worth the price of admission just for that.


Hmmm, once the front and back were joined it was apparent I had another problem to address. The front neck opening was droopy.


 Because this piece is cut on the bias it really needs some stabilizing. I could remove the top stitching and redo it but my old eyes can not see the top stitching thread when it is hidden in the fluff of the velveteen fabric. I thought about it and came up with this quick fix. I rummaged in my stash and found some elastic thread. I ran that along the underside of the neck edge hem, catching it in the over edge stitches.


It is not seen from the wrong side of the garment.
(pardon the fuzzy photo)


I had to be careful not to snug the elastic thread too tightly or the edge rolled to the outside. Here you can see how the elastic thread fixed the problem. The left side has the fix, the right side does not. huge difference.


Onwards and upwards. It was now clear that this top would be wearable. Uh oh, another issue. You see there is a problem with this fabric which is why I was willing to sacrifice it to a muslin. The color is gorgeous, the drape nice, the hand soft...what could be wrong? Ugly red dots. 


These make no sense. Why would the fabric designer ruin a perfectly good fabric? It looks like someone had an accident with glitter nail polish. I wanted to cover them up, but how? I purchased some black sequins and sewed them over the offensive dots. All better.


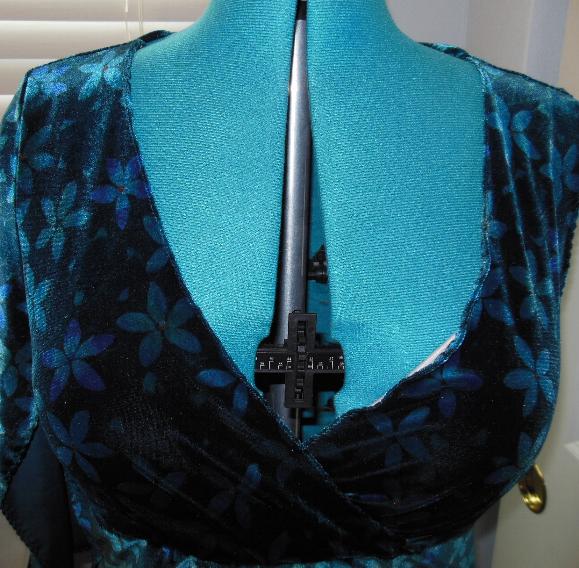
I sewed the rest of the top together and checked the fit. It fits better than most store bought tops I've had. There was just one more hurdle to clear. I had never hemmed a knit fabric before and was worried after that saggy neckline fiasco. I planned to use a twin needle with woolly nylon in the bobbin but I needed some type of stabilizer to keep the edge from stretching and to prevent skipped stitches. I experimented with some Stitch Witchery I had in my stash. The label claimed it did not impede the stretch of knits. And it didn't. I was going for teeny hems so cut the Stitch Witchery in half lengthwise and ironed it in place.


I then used the double needle to sew a hem that looks similar to a professional cover stitch found on purchased knitwear. As long as I sewed on top of the stabilizer I had no skipped stitches. I am thrilled and this will be my go to hem for knits. I think I will also try using the Stitch Witchery to stabilize the neck edges on my next version of this top. My friend, Lennea, gave me some lovely wine colored crushed velvet knit that will be perfect.


So here it is, my finished Lekala 8004. I love it and will wear it proudly! The only change I made was to give it 3/4 sleeves. In Roxi's closet most tops and dresses will have 3/4 sleeves. I adore them.


Saturday, February 23, 2013

Randine's Christmas Hoodie

Yes, I realize I am a couple of months late. That's how I roll. I don't know why it has taken me so long. These fleece hoodies sew up super fast. There isn't much to them.


I cut it out and sewed it up yesterday. She stopped by last night to pick it up. Mom made her model, of course.


What did she say? "Where's the pocket we discussed?" Oh, yeah. I forgot. Knowing that she wasn't going to be satisfied until it had a pocket I had her leave it overnight. Today I let her know it was ready, again. More modeling ensued.


I think she finally likes it.

Wednesday, February 20, 2013

Recent Sewing Bargains

I recently found these lovely vintage patterns for $.99 each plus shipping. I have a serious "thing" about vintage patterns. Can't resist them. I swear I am going to sew myself a bunch of vintage style dresses....just as soon as I fully understand altering patterns to fit my pudgy body.


Until then these will go live in the pattern file with the rest of my collection. I don't want to jinx it but there is the possibility I will be dragging home a box full of vintage patterns this weekend. Wouldn't that be wonderful?

Yesterday I was bored and decided to make the run of the local thrift shops in search of bargains. I found these 2 books on using a serger, for $1.99 each.


Apparently the Singer book is THE book to get if you want to learn about your serger. I also found these 3 fabrics in a bag for 30% off $2.99. The first are cottons and there are 3 yards each.


There was also this super groovy piece of knit fabric in there. Sadly it is only half a yard. I'll have to wait until I get a solid knit to mix it with.